
Absolutely simple, easy-to-follow Garden Tool Belt Tutorial for not-very-good-at-sewing sewers.
I’m not generally known as a ‘crafter’.
But how far could I go wrong with just a metre of fabric to be used? We’re aren’t talking major needlework on a grand scale here.
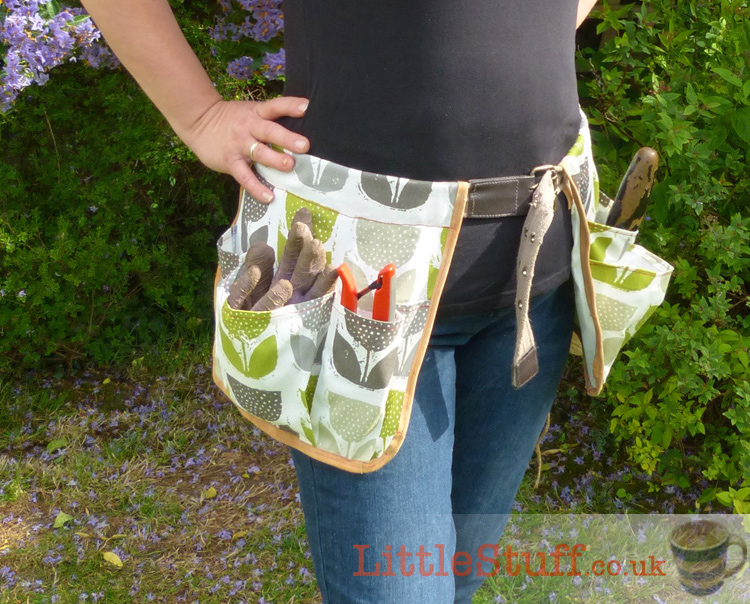
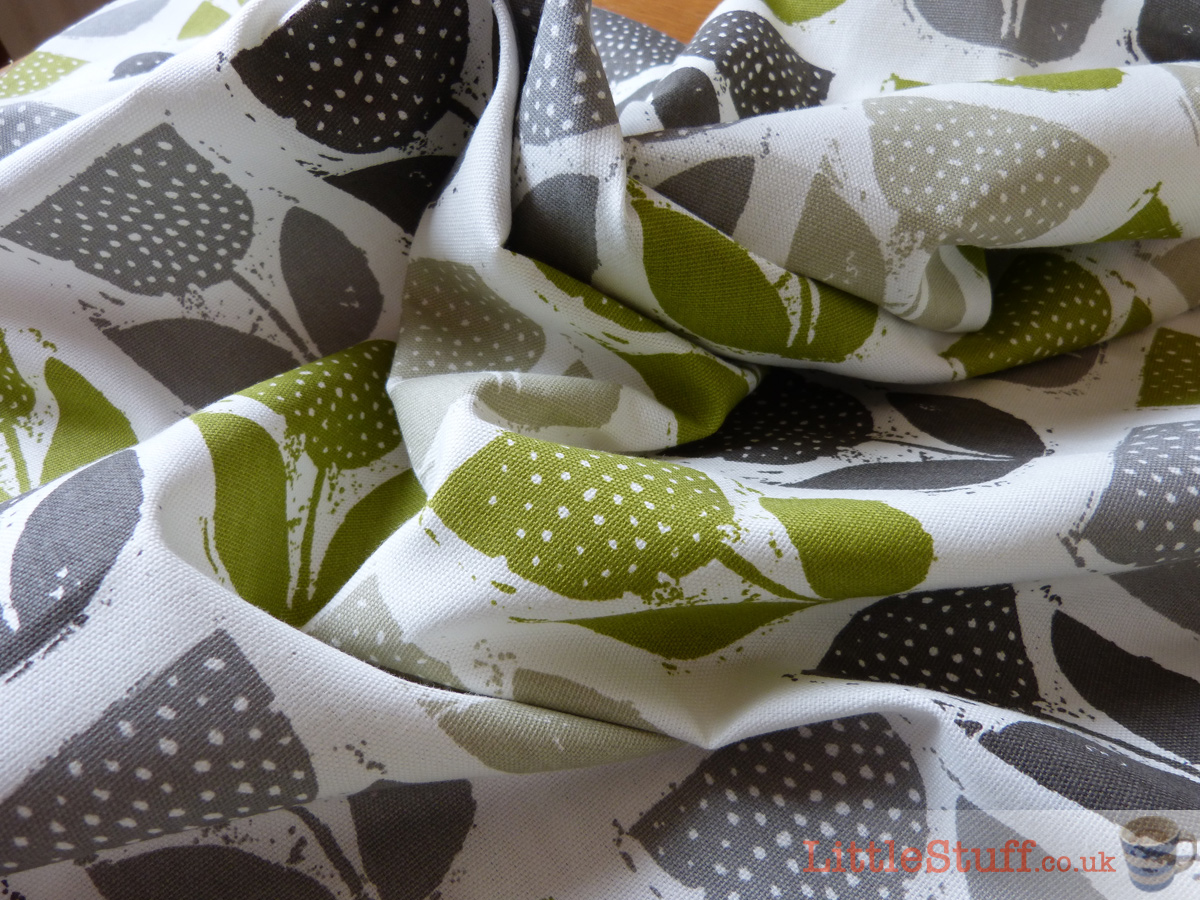
So – I’d already fallen in love with the Rayna Apple fabric, and with it’s fabulous green flowers design it was so patently perfect for a project that’s been nagging at me for quite some time – I thought I’d be bold and say yes to an afternoon’s crafting…
Okay, let me start by saying that I am NOT in any way qualified to teach anyone any sewing. I have a sewing machine, and a shadowy recollection of Home Economics back in the 80’s means I know how to thread it, and sew a straight line in running stitch. Beyond that? I’m not so good.
So this is a dead easy Garden Tool Belt – if I can make it, anyone can!
I didn’t have a pattern, I simply worked out what I wanted from a few pictures of tool belts I’d seen, and then figured it out as I went along. I actually made it as a gift for my mother-in-law, who’s a keen gardener, and always complaining about not having the string/knife/secateurs to hand just when she needs them
So – how to make a Gardeners Tool Belt for yourself? Easy peasy lemon squeezy. Ish.
What you need:
- 1 Metre Square of the Hillary’s Rayna Apple Material (or any heavy cotton)
- A belt that fits the intended wearer – I used an old webbing belt that I had in a drawer, but in an ideal world I’d have liked a plastic snap buckle one (and don’t worry, I will buy a new belt before giving it to my MIL!)
- Edging fabric – I used some old leather from my sewing box, but just use up what you have, or make it an excuse to go buy something pretty…
- Thread (I used red)
- Ruler
- Sewing Machine
- Scissors
- Pins.
How to make it in easy steps:
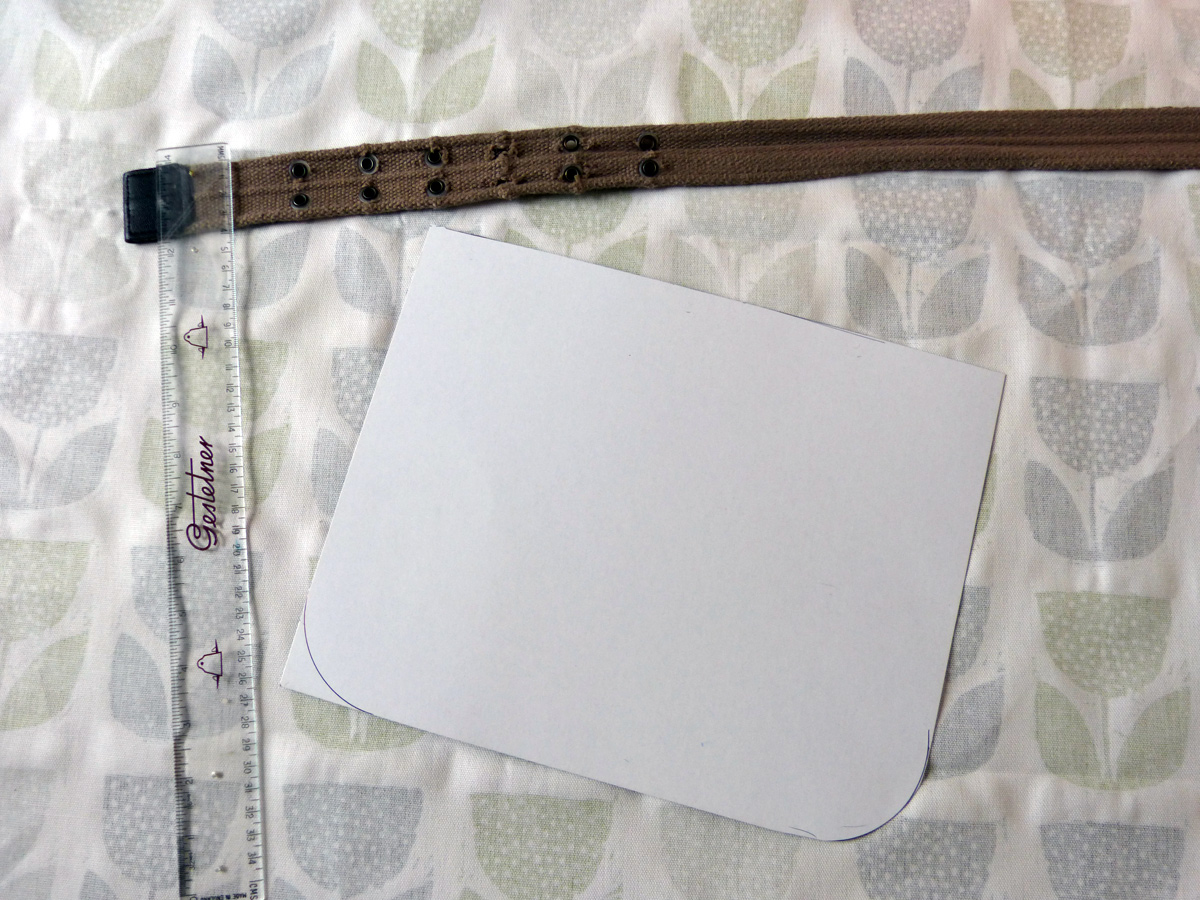

1 – Create a template (we’re working on one pouch at a time) – I used a 30cm square as my base (we’ll create the rounded corners later).
Measure your belt (mine was 3.5cm) and add 3x that measurement on to your template – so for my 3.5cm belt, I added 11cm at the top of my 30cm square, giving me a rectangle 30cm x 41cm. This will vary depending on your belt, obviously.
Using the template cut yourself one rectangle of the fabric to your selected size.
2 – Cut another rectangle of fabric: 17cm x 52cm. Fold over and press the top 1cm, and then hem. I’ve used a contrasting red thread just because it’s cheery to work with, but go with whatever you have to hand.

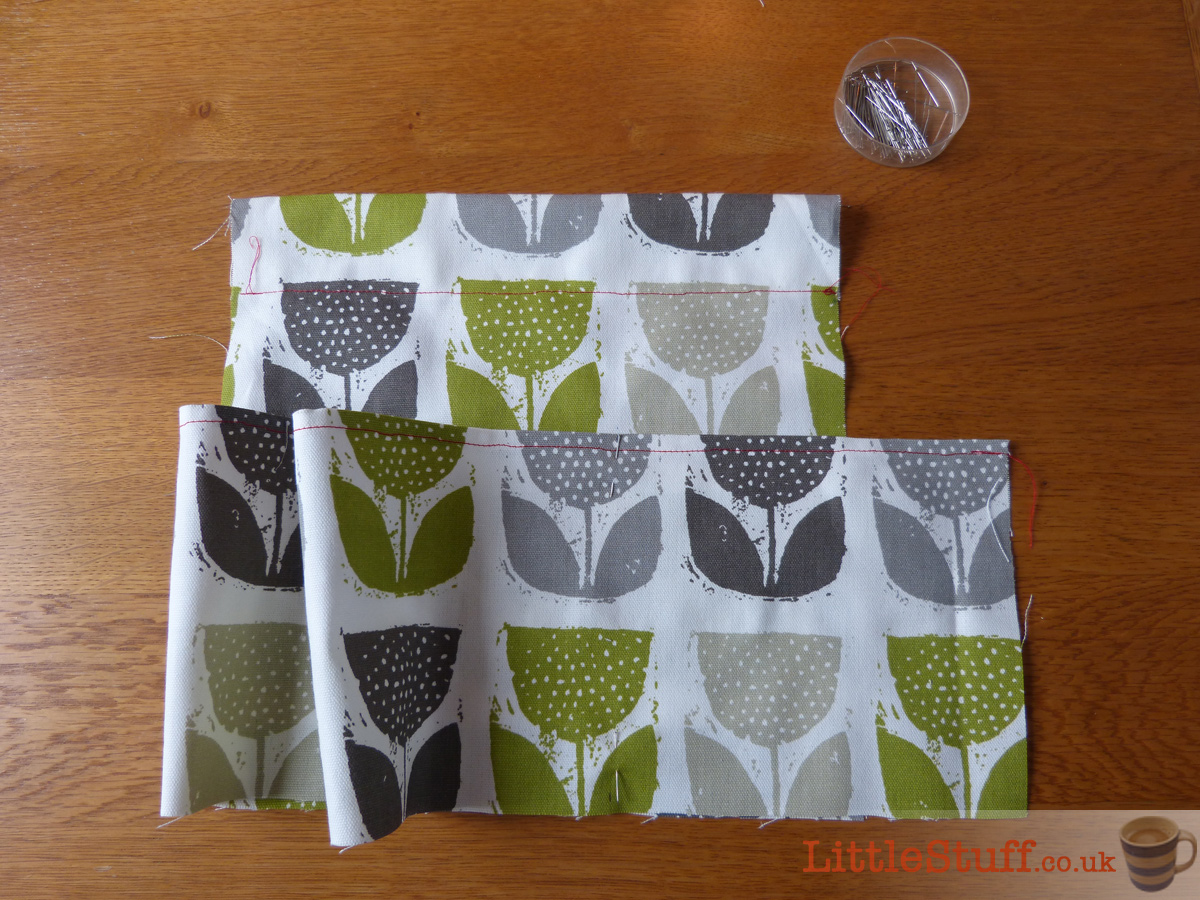
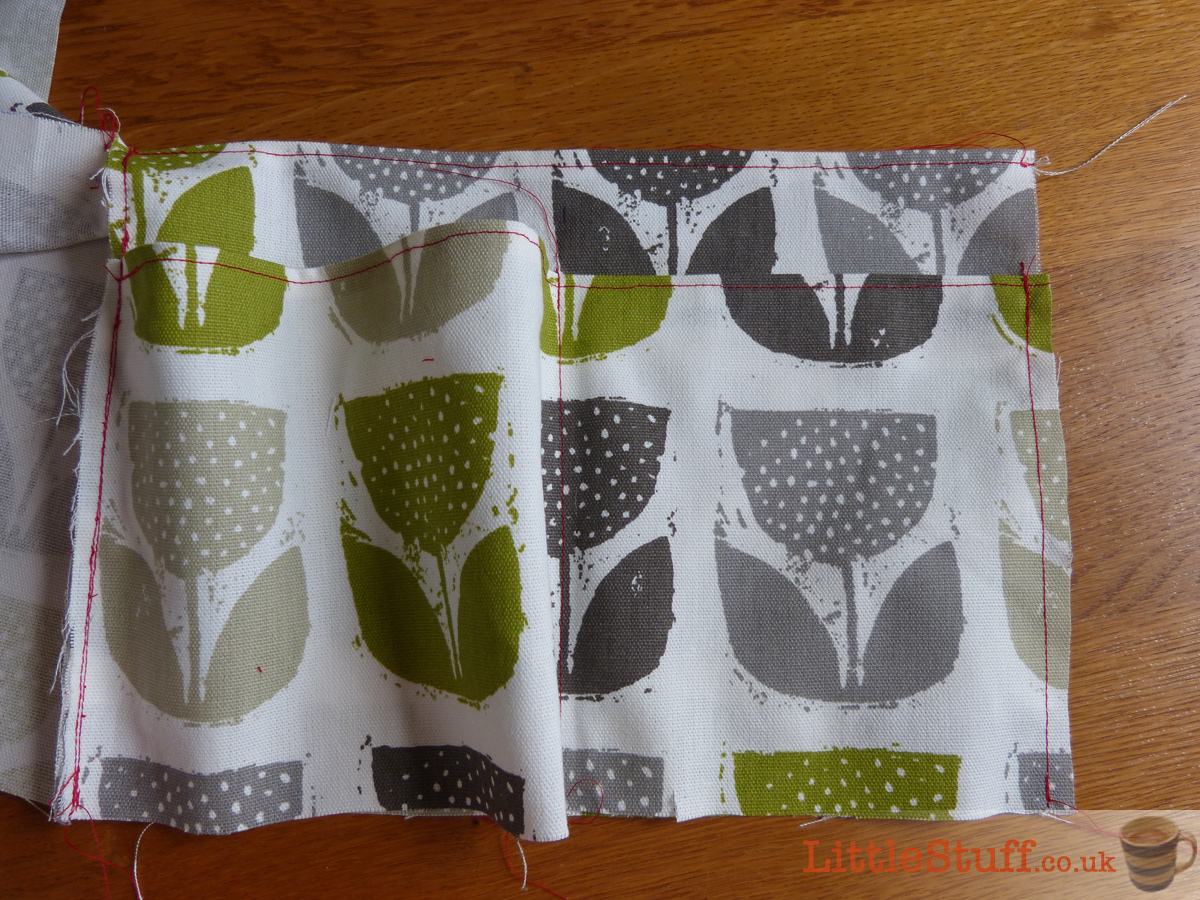
3 – Lay the 2nd long and narrow piece on top of the base rectangle, pin and then stitch to join them down the left hand side.
4 – Now we’re going to make our pockets. Fold the long piece loosely back on itself to create a tube, and pin it in place. Make free with whatever pocket sizes you fancy – I made mine as follows:
13cm fabric into a 7.5cm space.
23cm fabric into 11cm space
11cm fabric into 6.5cm space
5cm fabric flat on a 5cm space.
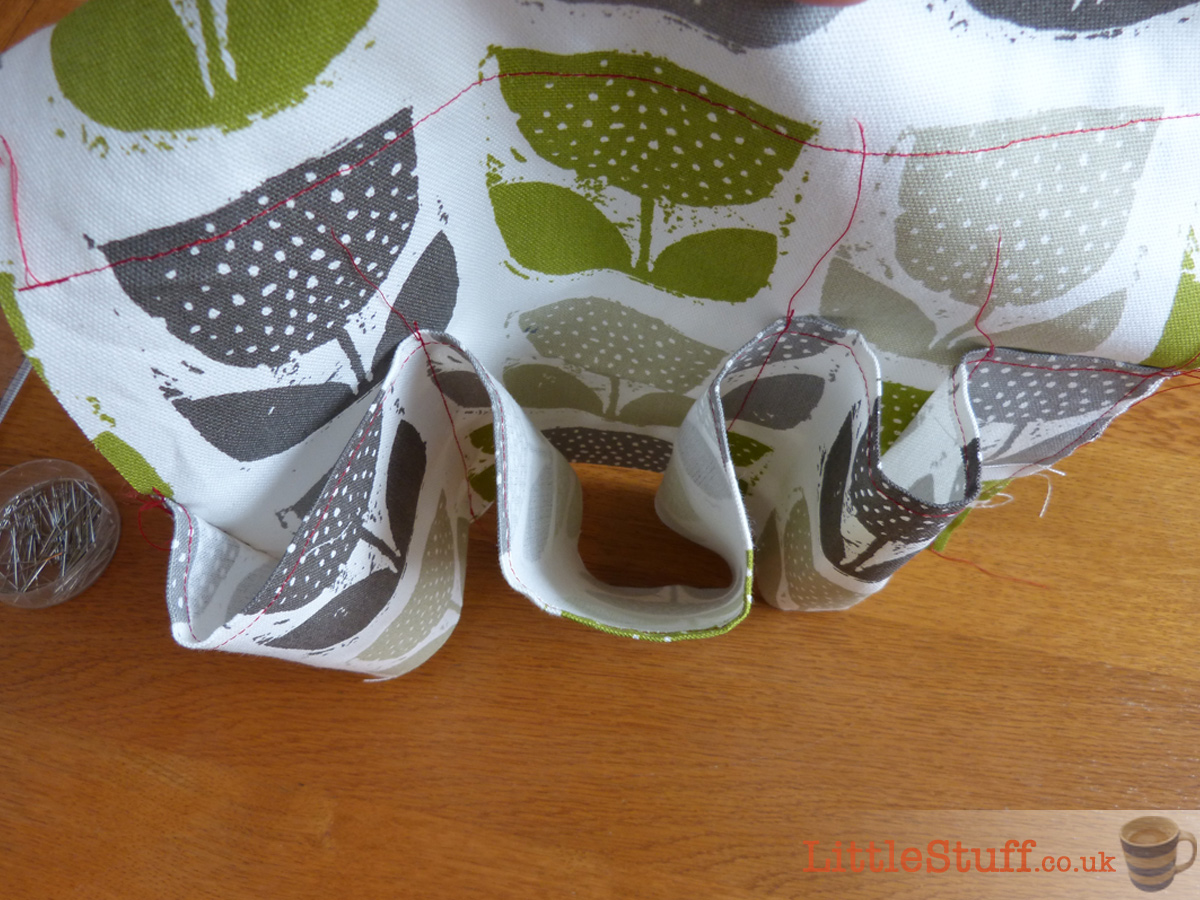
5 – Once you’re happy with your individual pocket sizes, simply run a line of stitching up each pin line to create your open-bottomed pockets (not really pockets, then. More ‘tubes’, really, at this stage!).
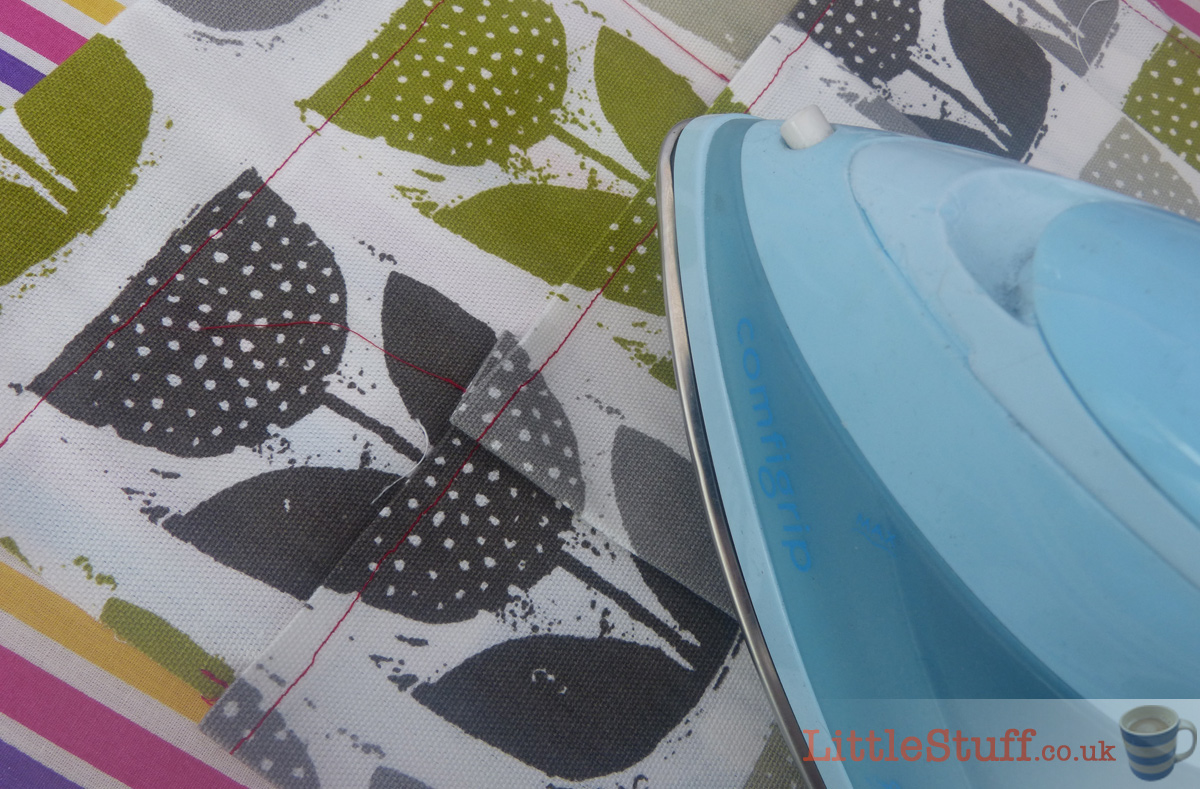
5A – You can move straight on to step 5B, or 6 here if you wish, but I wanted a neater look for these, so as an optional step, I headed to the iron, and pressed the pockets into flat pleats. As my central pocket is the biggest, I did the outside pockets first, and then folded the big pocket over the top of those.
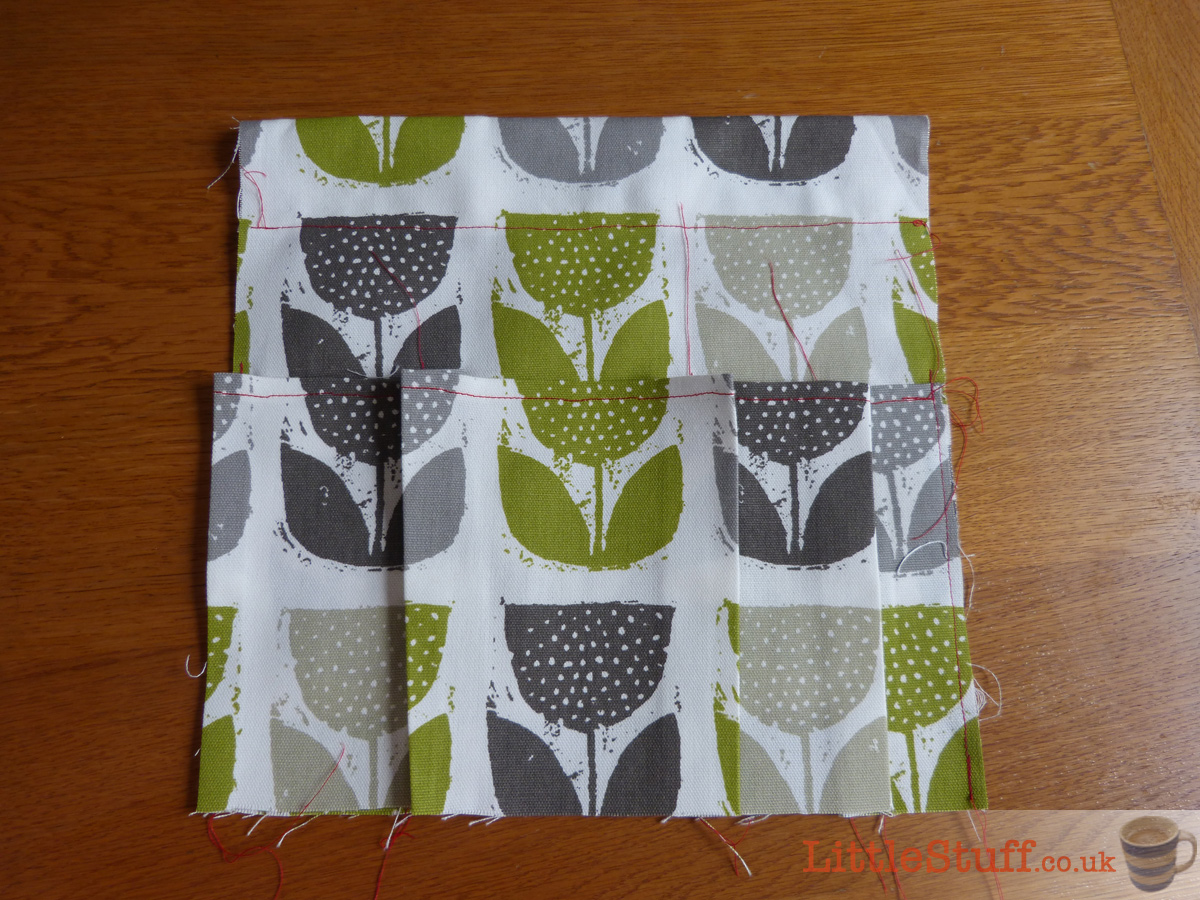
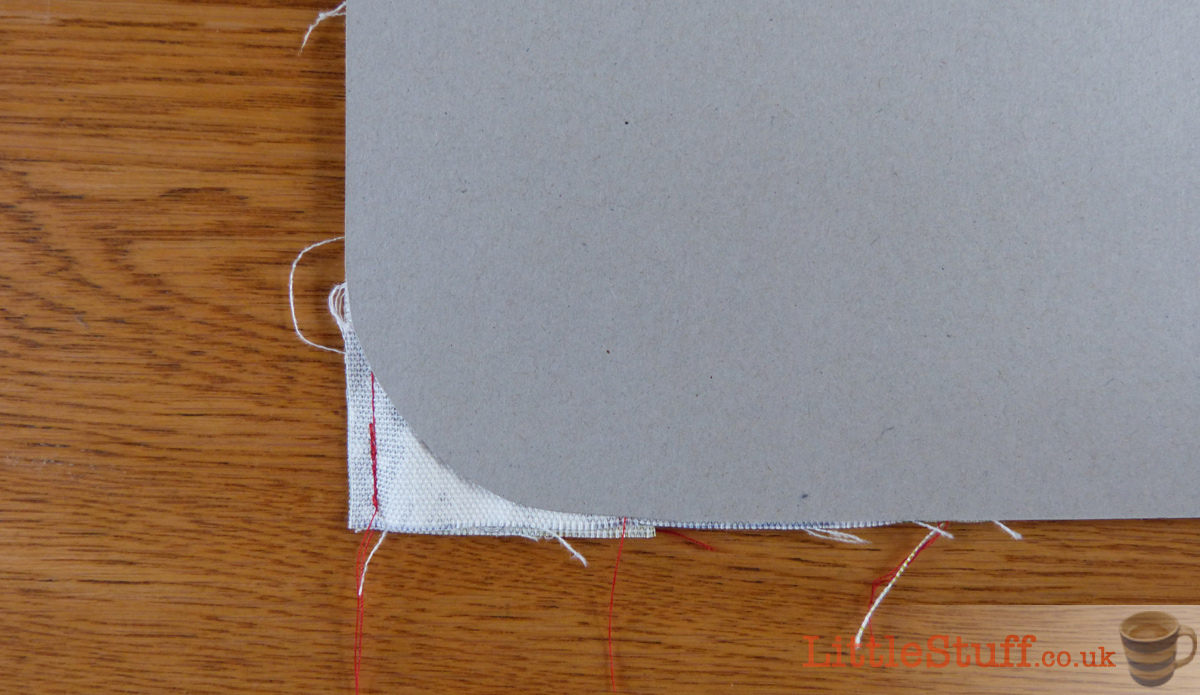
5B – You’ve now got our basic pouch shape with pockets. You can leave it as a neat square as shown above, or you can decide to make your life just a little more interesting, and go for rounded corners. I didn’t have a compass to hand, so I simply used a mug to draw round on the corner of my 30cm square template card, and used that as a stencil. A quick snip, and my corners were rounded neatly.
6 – Close up the bottoms of your pockets with a quick stitch across, and you’re ready for your edging (So Soon! I know!). Now I had a beloved knee-high pair of leather boots which finally died a death last winter. Whilst I mourned their demise, I did heartlessly attack them with the scissors and save all that fabulous soft leather before they went in the bin. It’s been in my sewing box ever since, just waiting for the perfect project. And here it is!
You could use any fabric you have to hand – something contrasting looks great, and something a little hard-wearing as it’s going to be taking the worst of the wear on the belt.
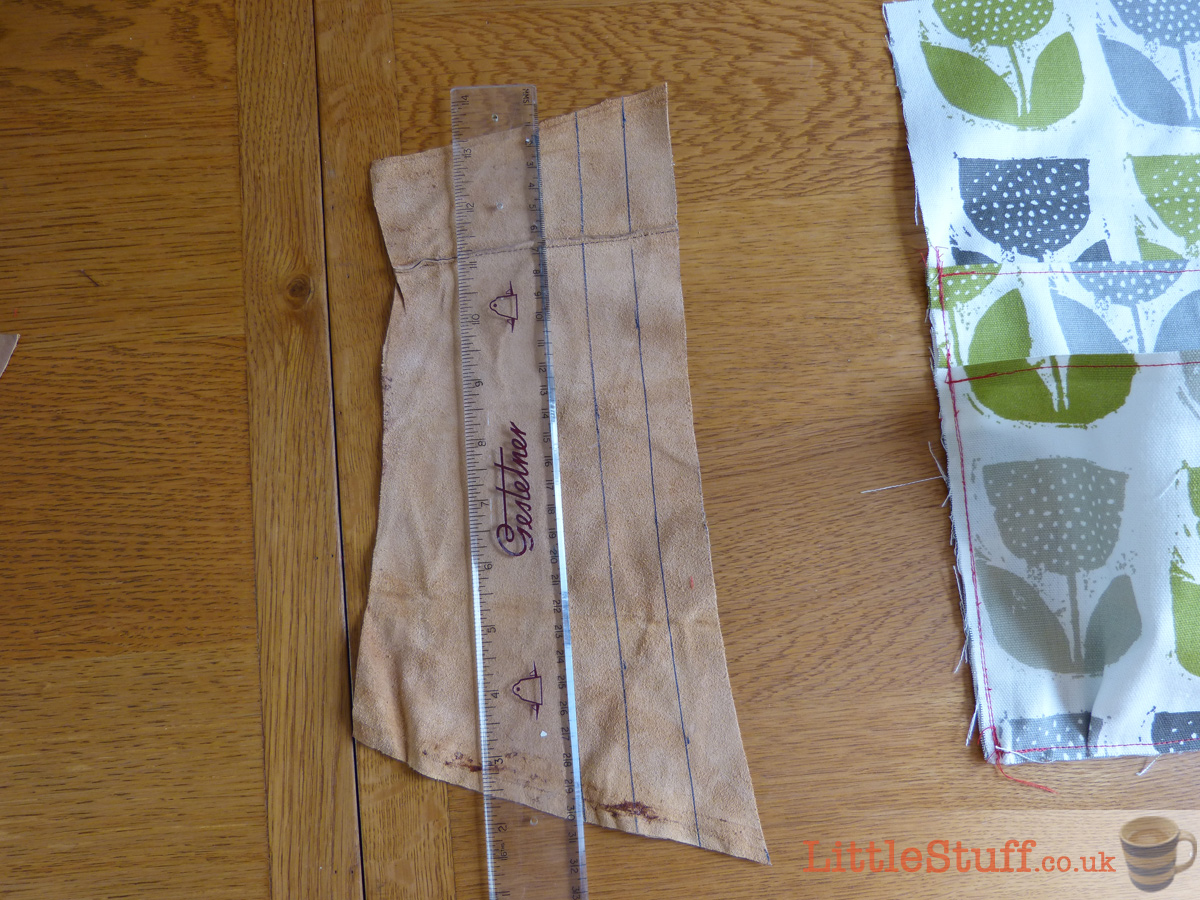
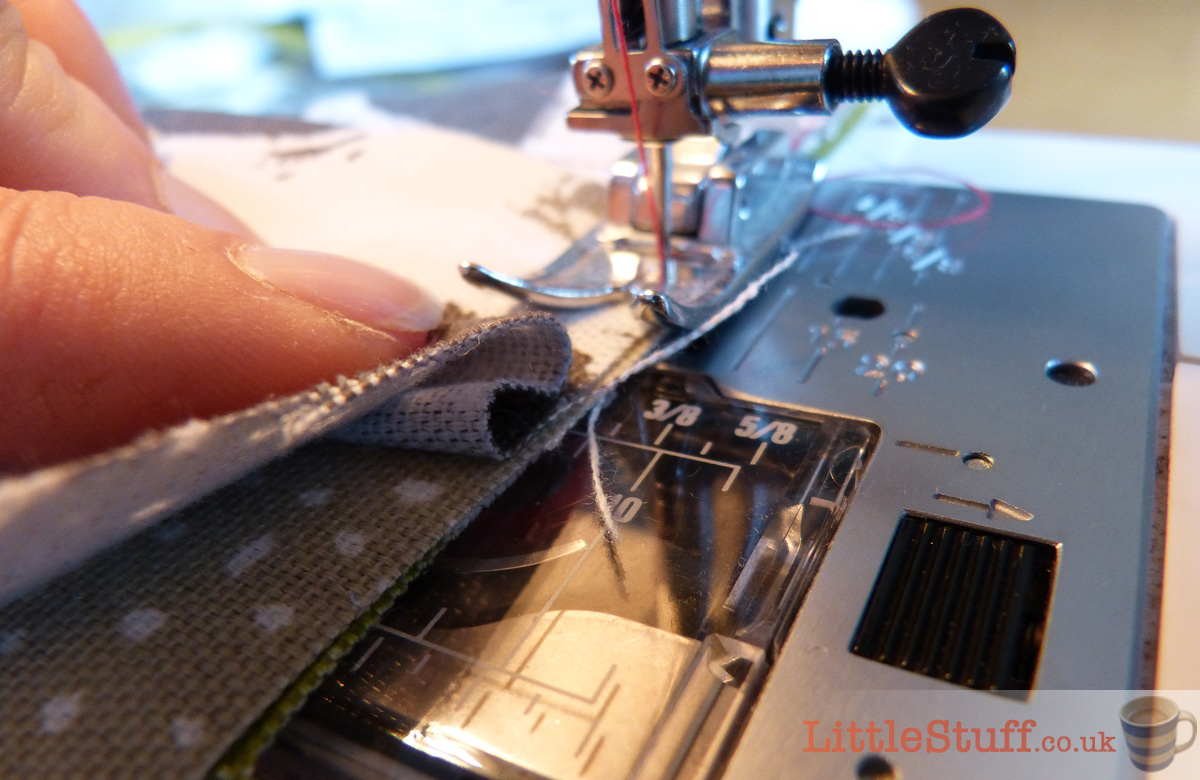
Obviously the pieces weren’t long enough to go all the way around, so I simply cut 2cm strips and stitched them together, so I ended up with one long 2cm ribbon of soft suede leather.
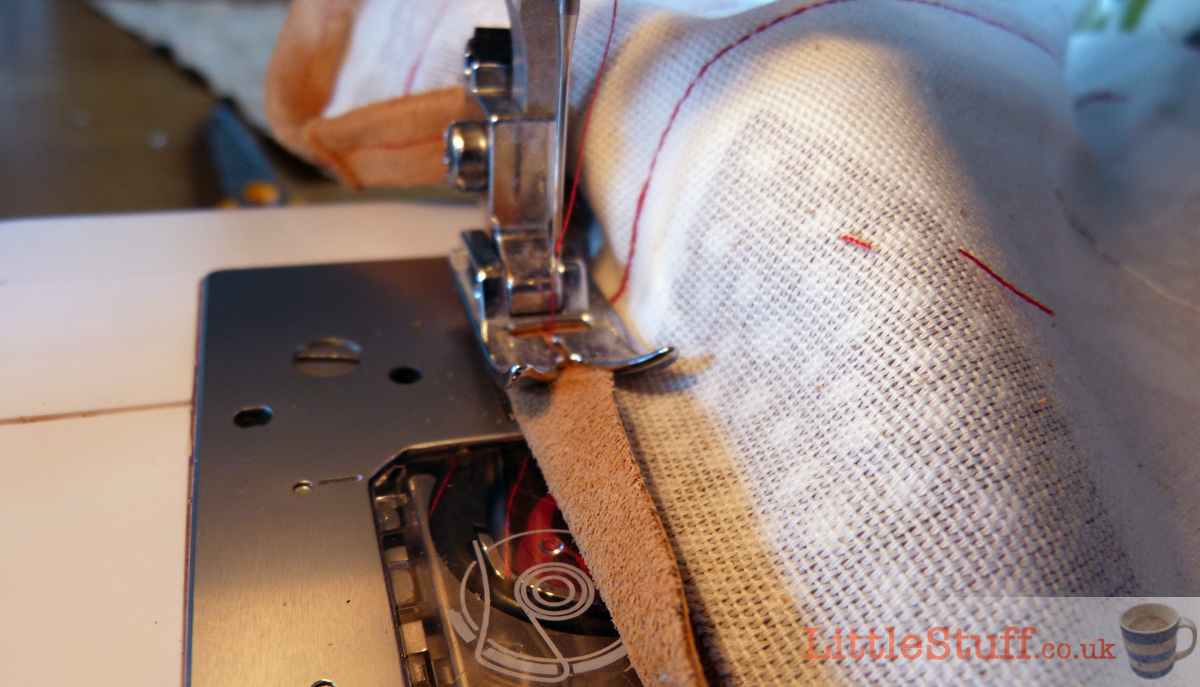
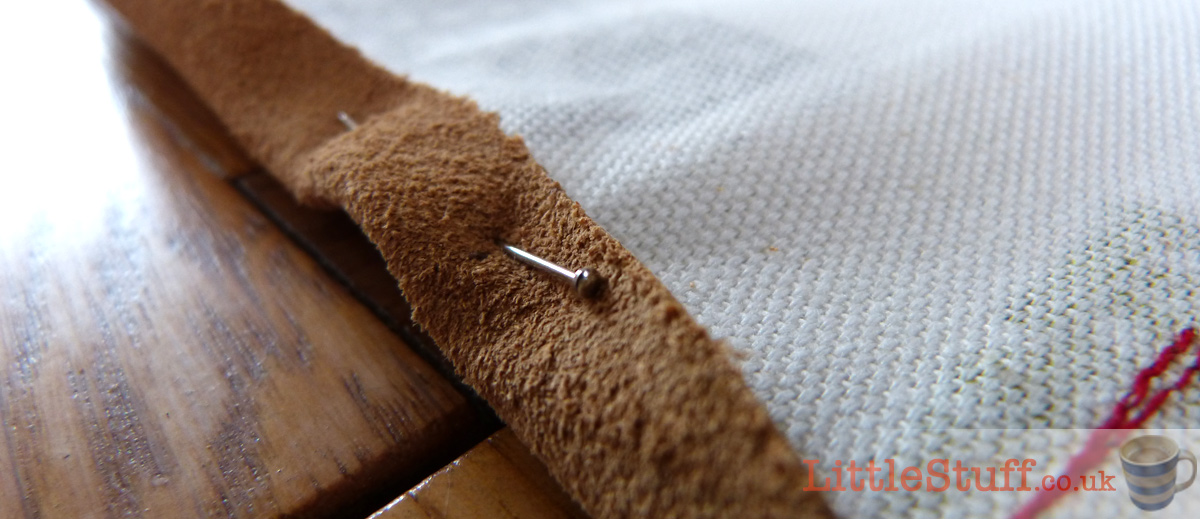
7 – Then it was simply a case of folding the edging in half, and pinning around the edge of the pouch. It’s slow and tricky when you’re using leather, but definitely possible. A thimble helped!
If you’re using a fabric that will fray, you’ll need to cut it in 4-5cm strips, stitch down the length and pull through to create a long tube of fabric to use.
8 – The edging. This is the trickiest part of the whole thing – mostly because I opted for leather, and for rounded corners, so my going was slow and careful (and this is why you don’t fold and stick the belt loop first. You can’t edge the top if it’s already stitched up!).
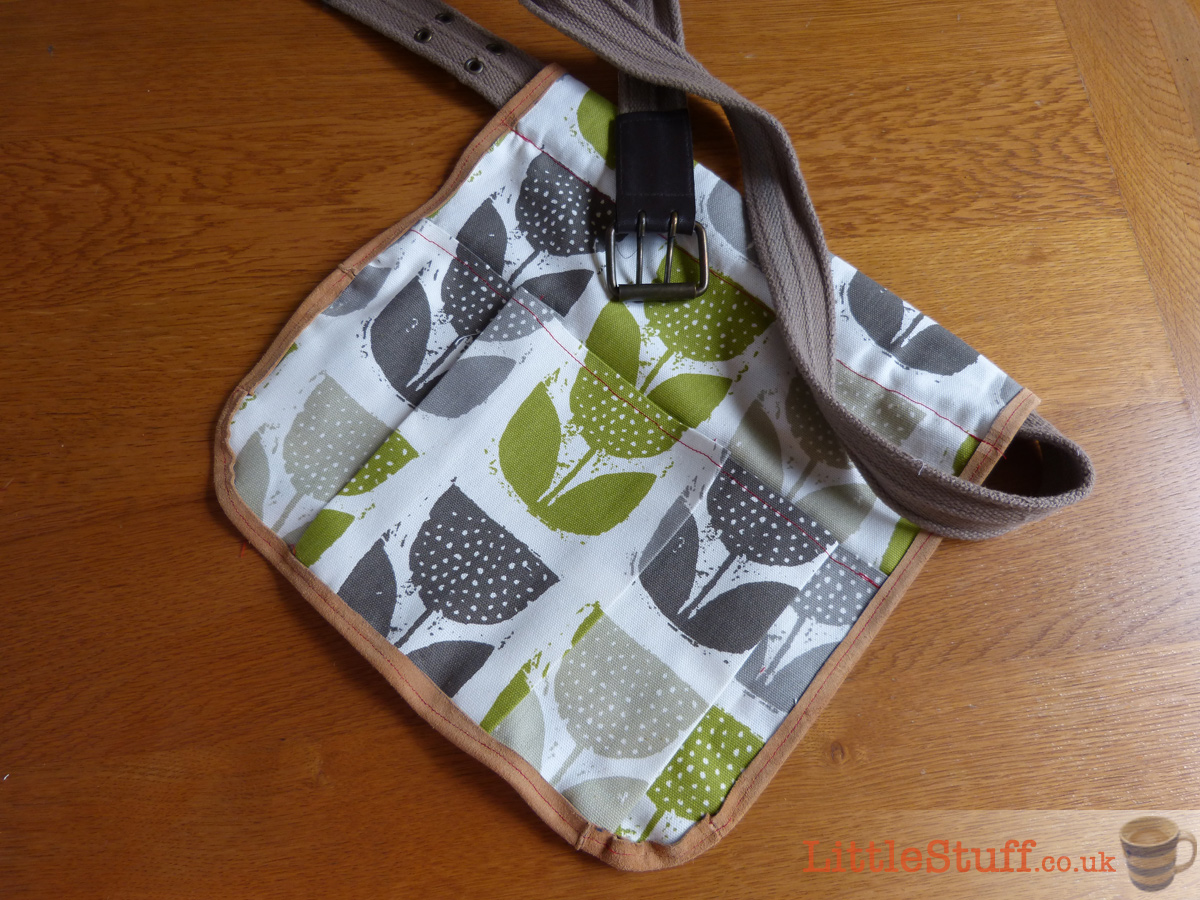
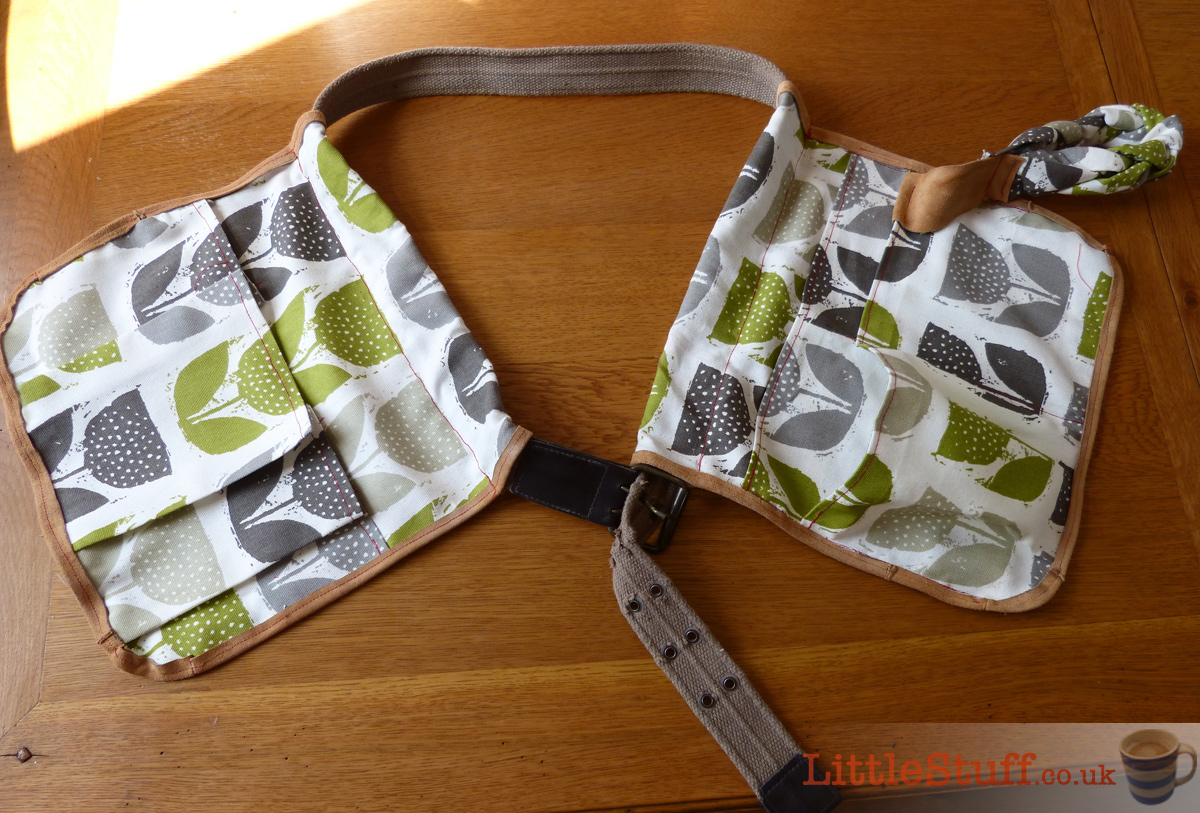
9 – Once you’ve edged all the way up to the top, flip the pouch over and mark the line on the back that you are folding your belt loop over to (this is the measurement you recorded in step 1 – my belt measured 3.5cm, so my line was 11cm down). Fold the top over backwards, and stitch across to make the long tube for the belt to slide through. Et Voila! Pouch one is complete!
10 – For the second one you could of course copy the first one exactly, and create two identical pouches. However, I wanted two different ones, so here’s what I did for pouch 2.
This time I cut three pieces of fabric:
Layer 1, the basic pouch template was identical to the first at 30cm x 41cm.
Layer 2, a new addition, was 30cm x 22cm.
Layer 3, my final pockets layer was 17cm x 52cm.
Press and hem the top 1cm of layers 2 and 3.
11 – Place Layer 3 on top of Layer 2. Stitch the two sides, and then create a larger twin pocket. I wanted one very large pocket, so had the right hand side almost flat, and all the excess fabric bagging on the left hand pocket.


12 – Place the joined Layers 2& 3 onto Layer 1, and stitch the sides: we now have the basic second pouch. This time we have a double layer of pockets, one full-width envelope plus two roomier pockets for bigger items.
13 – Because I didn’t press neat pleats into this side, I needed to pleat the bottom as I stitched it up across the bottom. This keeps the pocket loose and roomy, rather than flattened.
14 – Once you’ve stitched and closed the pockets this is what you’ll have; second pouch all set and ready for edging.
Round the corners off if you choose, and repeat steps 6 through to 8 for this pouch – it’s an identical process, and you’ll finish with two beautifully edged pouches.
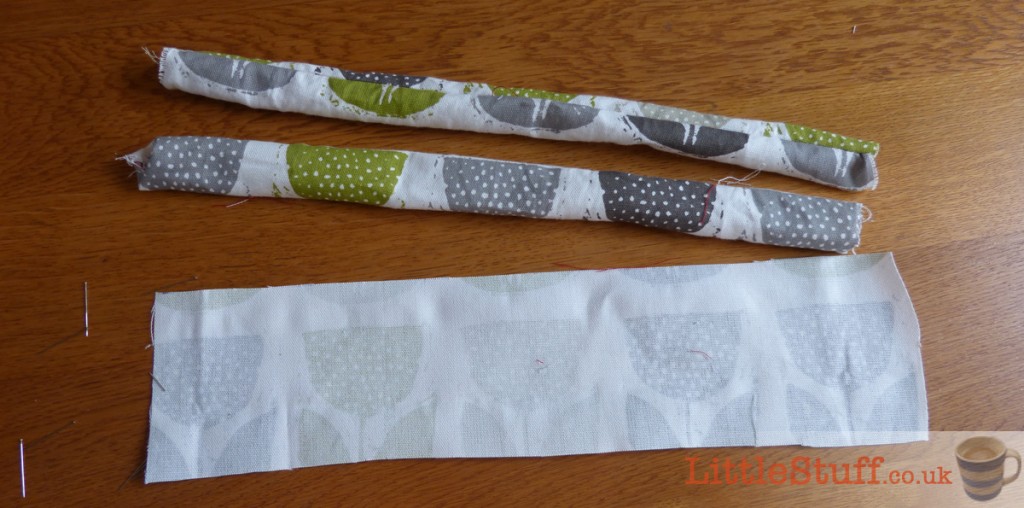
15 – All that’s left is the string holder loop, which is actually the deluxe version, the optional extra on the standard model! You have a perfect Toolbelt right now, but if, like me, you like to keep your string on a spool, it’s usually too big to fit in the pockets. So I created a little extra just for the string. Simply cut three strips of your fabric 34cm x 5cm. Stitch them into tubes on the reverse side, and then pull them through to make them look pretty.
Stitch them one-on-top-of-the-other at one end, and then simply plait the three, stitching again at the bottom to seal the plait.
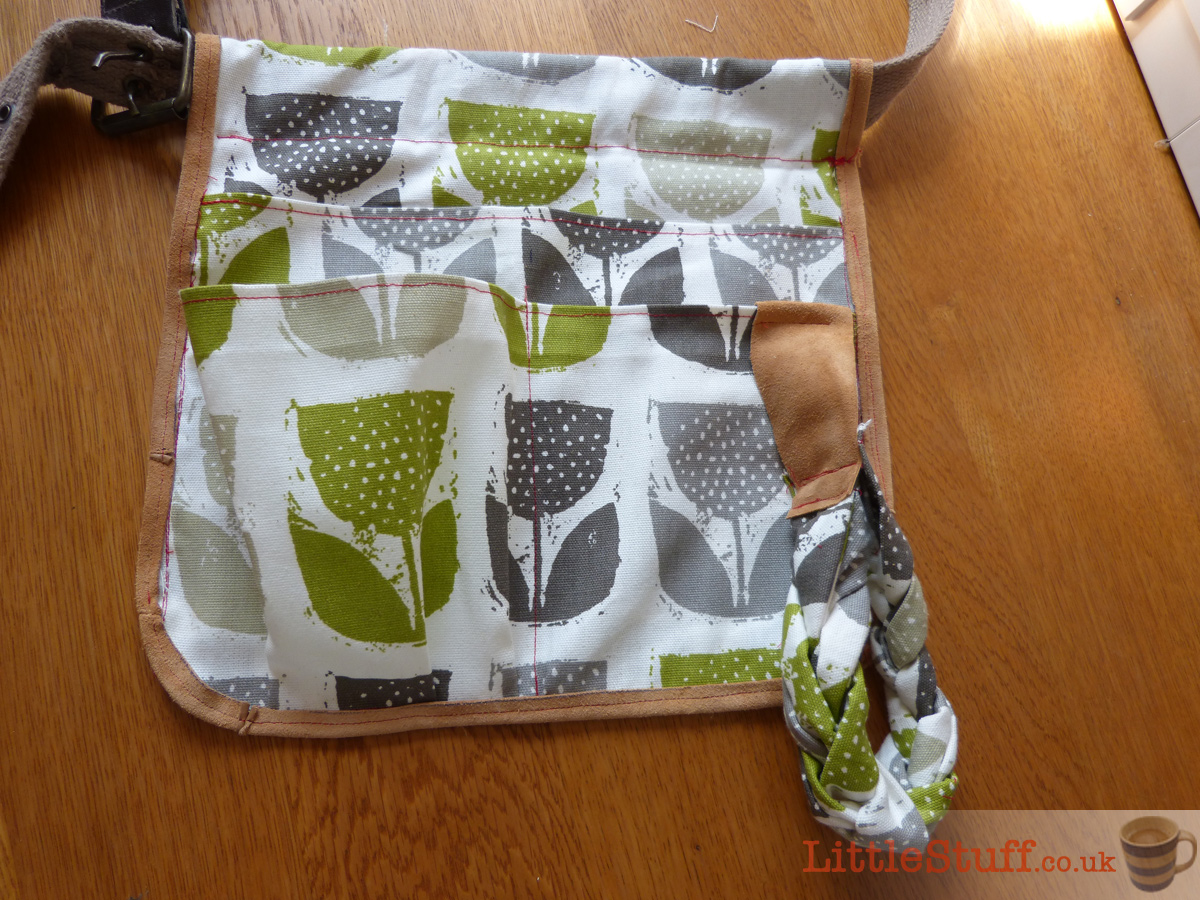
16 – Attach them to a 12cm x 4cm tab of your edging fabric, and stitch by hand to the pocket of your choice (or sneakily & determinedly squoosh the edge of your pocket and force it into your machine *cough*). Make sure you only stitch to one pocket, not all the way through!
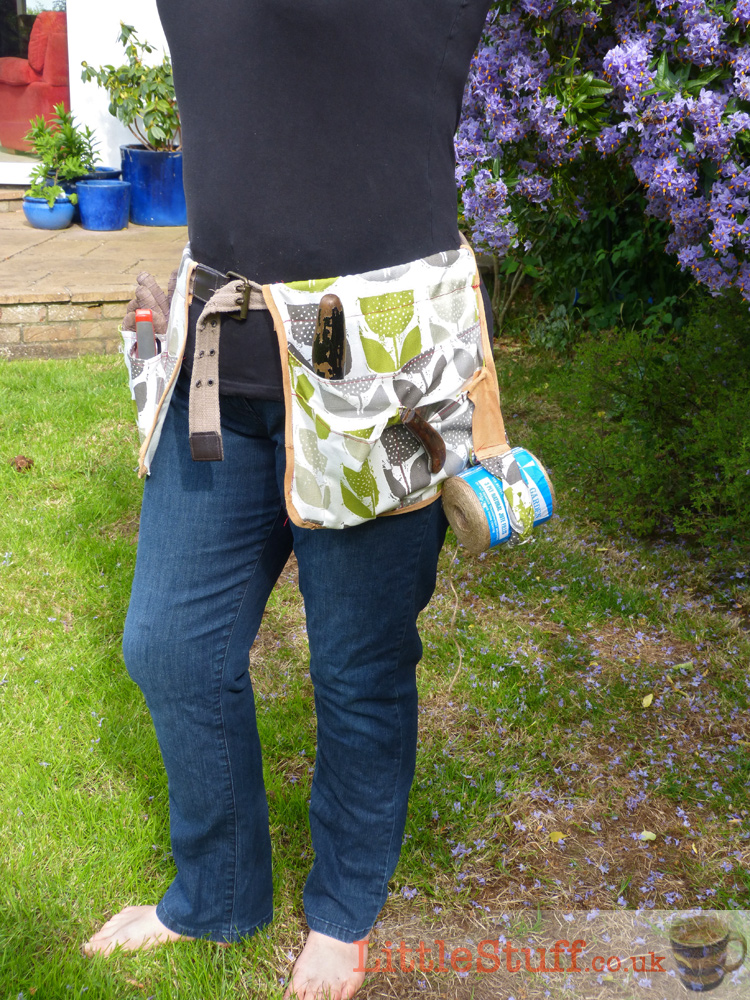
And you’re done – you made it to the end of the deluxe version! All that’s left for you to do is to thread your pouches onto your belt, and get out into the garden! Having them as separate units means they can be moved around your waist, or onto your back, as you feel most comfortable. And if the belt breaks – no big deal, just move them onto a new one!
17 June 2015
great make!!! the fabric works well as a garden tool holder, love the detail in your tutorial.
Good luck!
Hannah
x
http://www.daintyandivory.blogspot.co.uk
30 November 2015
How useful! I usually try to wear clothes with bug pockets , but this is really more practical. I’m definitely making one for me! Thank you so much for sharing!
16 August 2016
This is a very useful and well done tutorial. Thank you very much, I’m glad I found it.
7 February 2018
You’re awesome! Thank you for this.
16 May 2018
Love this..i am going to make one for my cousin..she is a gardner and i think she will like this. I wish the sizes of the fabric was in inches though!! Thank you!
13 June 2023
sorry – will try and create a converted version!
31 March 2024
This may help. There are 2.5cm to an inch. Simply divide the centimeters by 2.5. 1 meter is approximately 39 inches…close enough. 30cm is 12 inches.
Just requires a bit of math…a very little bit.
19 July 2018
I really like the idea of using a belt, and especially I like the idea of SIDE pockets. When I’m working in the garden I do a lot of bending and am constantly having to turn my existing belt/apron to the side so it’s not in the way. Thanks for posting your very useful and practical idea!
13 June 2023
I tend to swivel them almost to my back when I’m working – like you say, front pockets are so in the way!
24 May 2020
Im in US and we are backwards in the measurement department. Is there an easier way to get the measurements in “inches” than googling a calculator? Love the pattern and thank you!
2 April 2022
Thanks for this, definitely going on my to do list, as a diabetic gardener, I need to carry diabetic supplies, pump and reader and phone as well as the usual paraphernalia for gardening, this will be SO useful.
Thinking of making it from old denim jeans? ?
13 June 2023
Denim would be a great fabric to use!
31 March 2024
I know I’m late to the party…the original post…but divide cm by 2.5. You’re done. 30cm divided by 2.5 is 12.
10 June 2023
I do not garden. BUT I do clean and dust (occasionally) so I will make one to carry my supplies with me. Save some running back and forth for stuff I forgot. Thanks for a great tute!
13 June 2023
Genius – maybe we all just need a daily utility belt to stop us wandering about saying ‘where did I put my… (glasses/keys/phone/remote/pen/list…)
24 December 2025
Just made this for my Dad’s Christmas present and it was delightfully easy to follow your instructions and I am thrilled with the result – handsome and highly functional. Next I’ll need to make one for myself.
11 February 2026
I bet he was THRILLED with it – it’s such a practical, useful thing!